In the Service menu item it is possible to cancel reserved or sold seats ( Cancel reserved seats, Cancellation of sale ) and make changes to their visibility and placement in the auditoriums
( Seat
setup, Auditorium setup).
Another useful option is customizing the ticket template by choosing which information is to be
printed on the ticket (Ticket template submenu item).
Cancel reserved seats
Cancellation of sale
The sale of individual seats can be cancelled. First the user chooses the program in which there
is a need for cancellation by clicking the Program button. Sold seats are then
selected (only red
seats can be selected) by clicking on them. The cancellation procedure is finished by clicking on
the Cancel sale button.
Seat setup in auditoriums
In this section table rows are defined for each row of seats in an auditorium. The user can modify
the number of seats in each row, the row label, starting position of the first seat in the row and the
direction (right to left or left to right) of the numbering of the seats in the row.
Auditorium setup
The user can mark some of the seats as invisible in order to create a more realistic plan of an
auditorium. This is done by clicking on the seats which then become invisible. Clicking on the
same location makes the seat visible once again.
All changes made to the seats in the selected auditorium are saved when the button Save is
clicked.
Ticket templates
First we choose the template we want to edit.
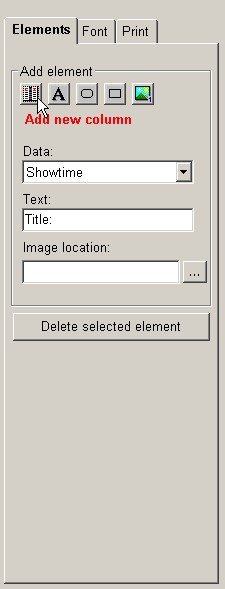
Then we can add an element by clicking on the corresponding icon:
 Elements that can be added are (icons are from left to
right): columns (data in the basic tables), text fields, rounded rectangles, rectangles and images.
When an icon is clicked, a message below the icon group shows which element will be added
when the main template area is clicked. E.g. The text 'Add new column' appears in red font color
when the 'column' icon is clicked. If the same icon is clicked for the second time, the text
disappears, meaning the action of adding elements is cancelled.
The column which is to be added can be selected in the drop down menu 'Data'. The field 'Text' is
used when text fields are added and the 'Image location' field is used when the user has chosen
to add an image to the ticket template.
When the 'Font' tab is clicked, fields that determine font type, size and alignment are shown.
When the 'Print' tab is clicked, the user can select the size and orientation of the paper the ticket
will be printed on.
Templates are saved by clicking on the Save button, or on the Save as... button
if the template is
saved under a different label (which must be typed in the Template label field).